
Yan Cui
I help clients go faster for less using serverless technologies.
This is part 2 of a multipart series that explores ideas on how we could apply the principles of chaos engineering to serverless architectures built around Lambda functions.
- part 1: how can we apply principles of chaos engineering to Lambda?
- part 2: latency injection for APIs <- you’re here
- part 3: fault injection for Lambda functions
The most common issue I have encountered in production are latency/performance related. They can be symptomatic of a host of underlying causes ranging from AWS network issues (which can also manifest itself in latency/error-rate spikes in any of the AWS services), overloaded servers, to simple GC pauses.
Latency spikes are inevitable – as much as you can improve the performance of your application, things will go wrong, eventually, and often they’re out of your control.
So you must design for them, and degrade the quality of your application gracefully to minimize the impact on your users.
In the case of API Gateway and Lambda, there are additional considerations:
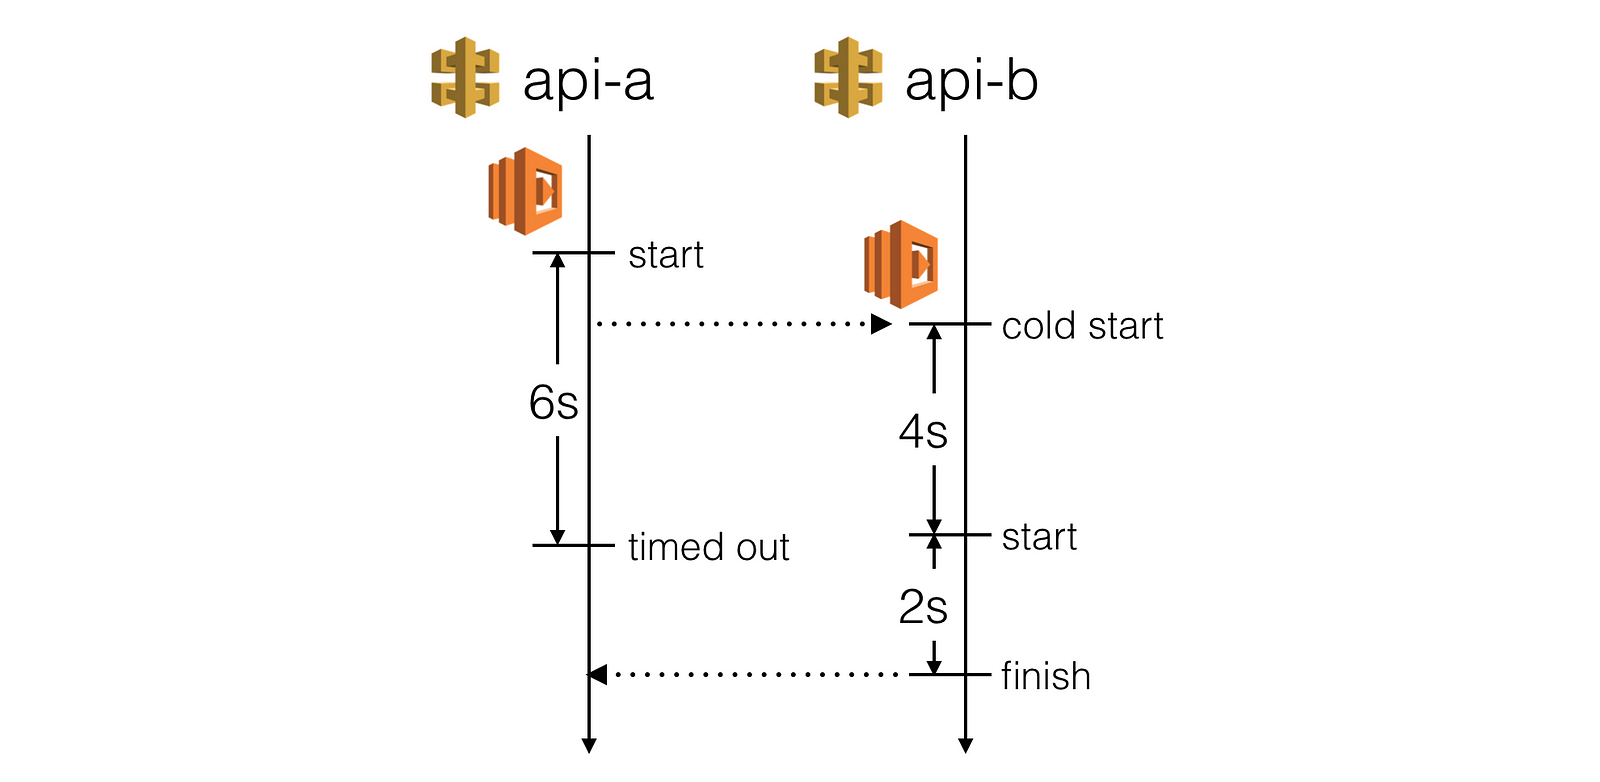
- API Gateway has a hard limit of 29s timeout for integration points, so even if your Lambda function can run for up to 5 mins, API Gateway will timeout way before that
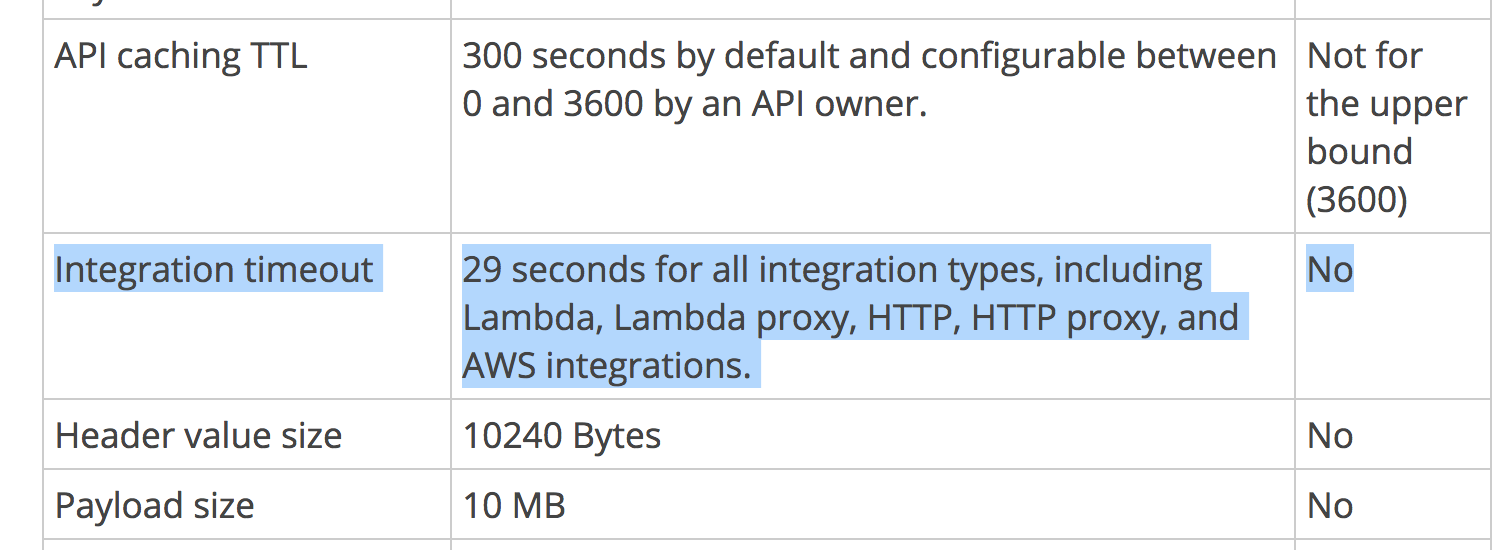
- You need to consider the effect of cold starts, which is heavily influenced by both language runtime and memory allocation. A cold start in an intermediate service can easily cause the outer service to timeout.
Where to inject latency
Suppose our client application communicates directly with 2 public facing APIs, whom in turn depends on an internal API.
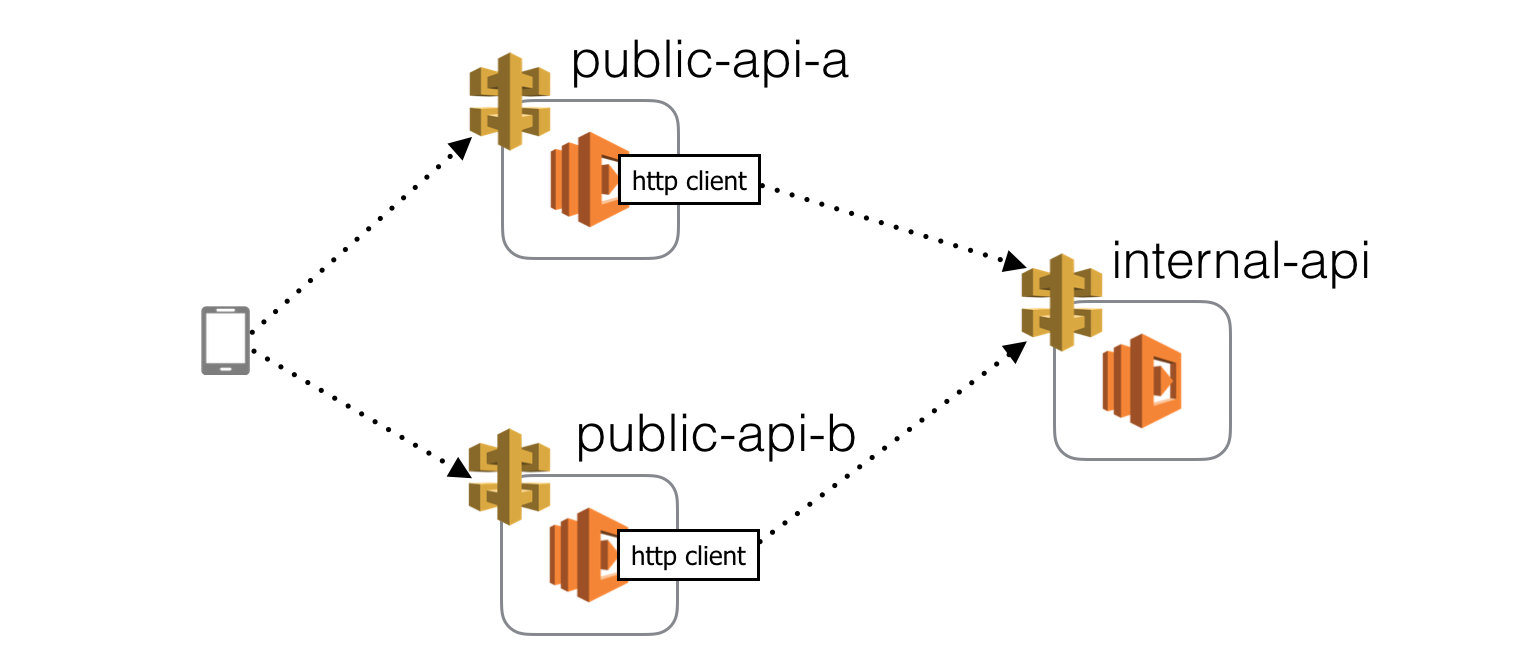
In this setup, I can think of 3 places where we can inject latency and each would validate a different hypothesis.
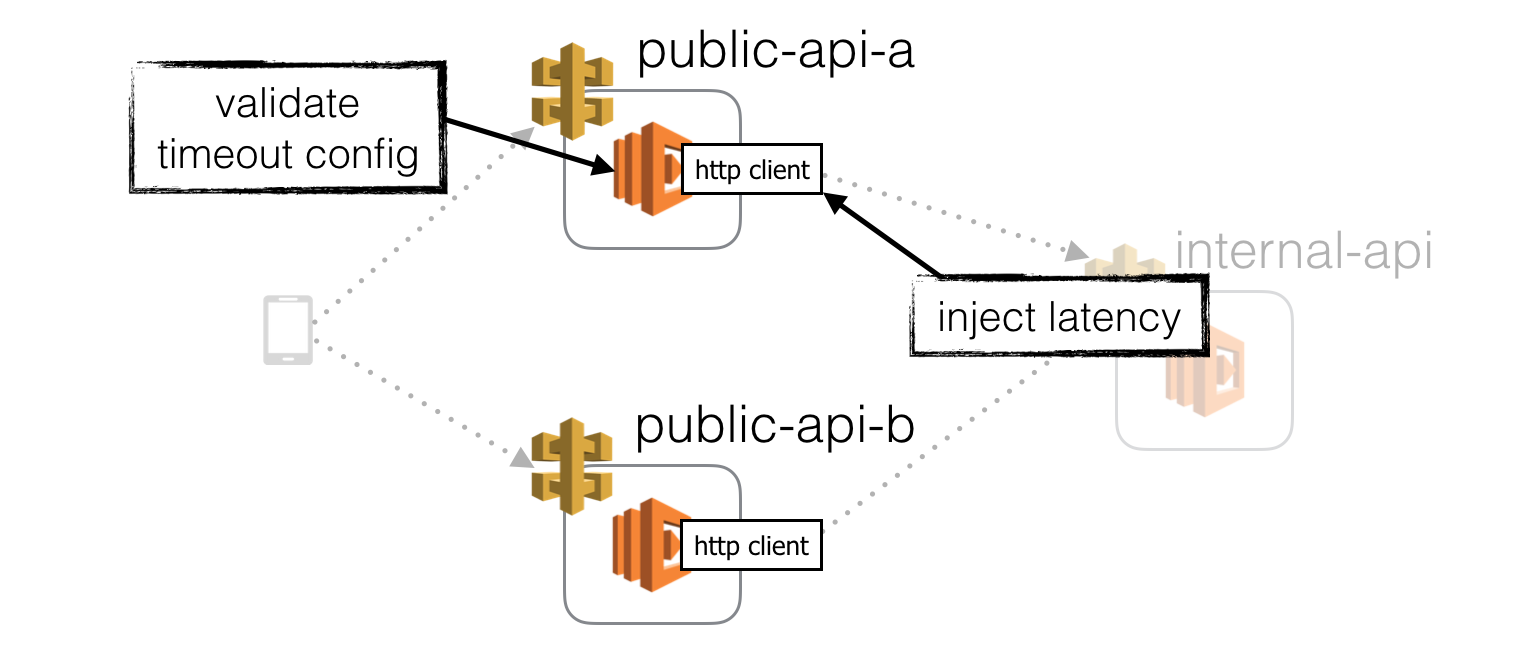
Inject latency at HTTP clients
The first, and easiest place to inject latency is in the HTTP client library we use to communicate with the internal API.
This will test that our function has appropriate timeout on this HTTP communication and can degrade gracefully when this request time out.
Furthermore, this practice should also be applied to other 3rd party services we depend on, such as DynamoDB. We will discuss how we can inject latency to these 3rd party libraries later in the post.

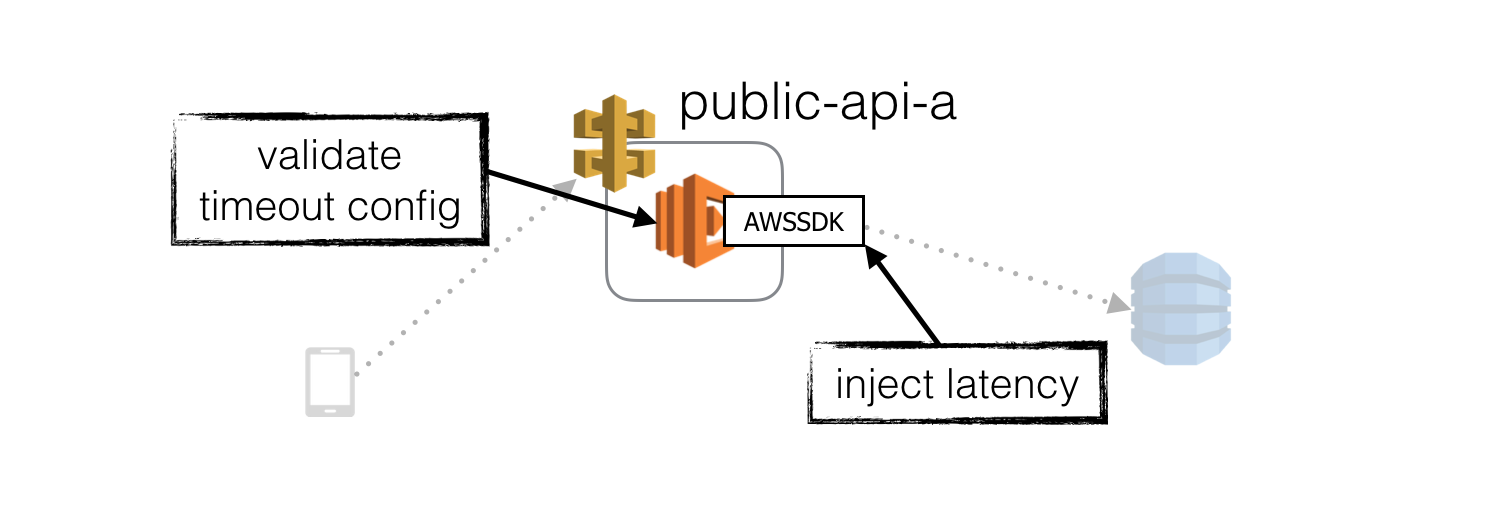
This is a reasonably safe place to inject latency as the immediate blast radius is limited to this function.
However, you can (and arguably, should) consider applying this type of latency injection to intermediate services as well. Doing so does carry extra risk as it has a broader blast radius in failures case – ie. if the function under test does not degrade gracefully then it can cause unintended problems to outer services. In this case, the blast radius for these failure cases is the same as if you’re injecting latency to the intermediate functions directly.
Inject latency to intermediate functions
You can also inject latency directly to the functions themselves (we’ll look at how later on). This has the same effect as injecting latency to the HTTP client to each of its dependents, except it’ll affect all its dependents at once.
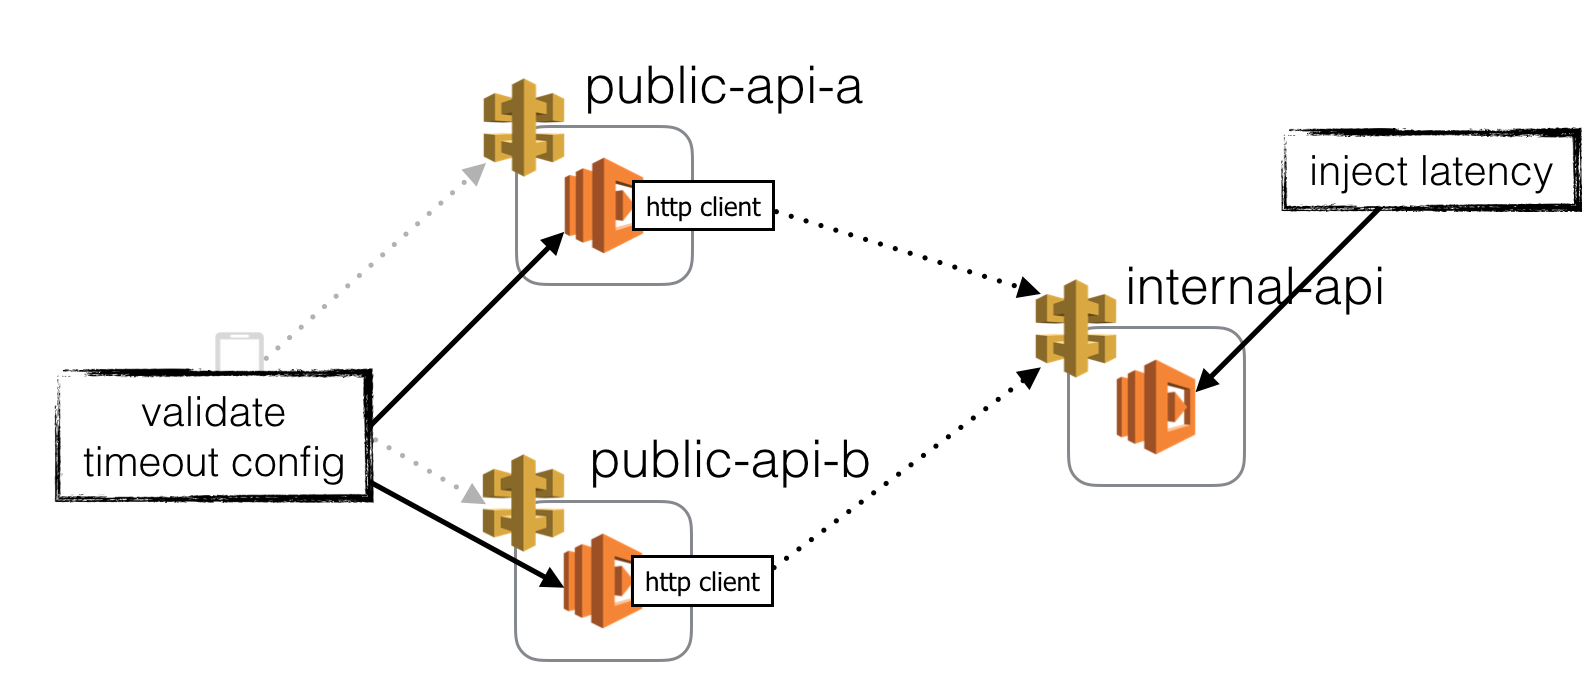
This might seem risky (it can be), but is an effective way to validate that every service that depends on this API endpoint is expecting, and handling timeouts gracefully.
It makes most sense when applied to intermediate APIs that are part of a bounded context (or, a microservice), maintained by the same team of developers. That way, you avoid unleashing chaos upon unsuspecting developers who might not be ready to deal with the chaos.
That said, I think there is a good counter-argument for doing just that.
We often fall into the pitfall of using the performance characteristics of dev environments as predictor for the production environment. Whilst we seldom experience load-related latency problems in the dev environments?—?because we don’t have enough load in those environments to begin with?—?production is quite another story. Which means, we’re not programmed to think about these failure modes during development.
So, a good way to hack the brains of your fellow developers and to programme them to expect timeouts is to expose them to these failure modes regularly in the dev environments, by injecting latency to our internal APIs in those environments.

In fact, if we make our dev environments exhibit the most hostile and turbulent conditions that our systems should be expected to handle, then we know for sure that any system that makes its way to production are ready to face what awaits it in the wild.
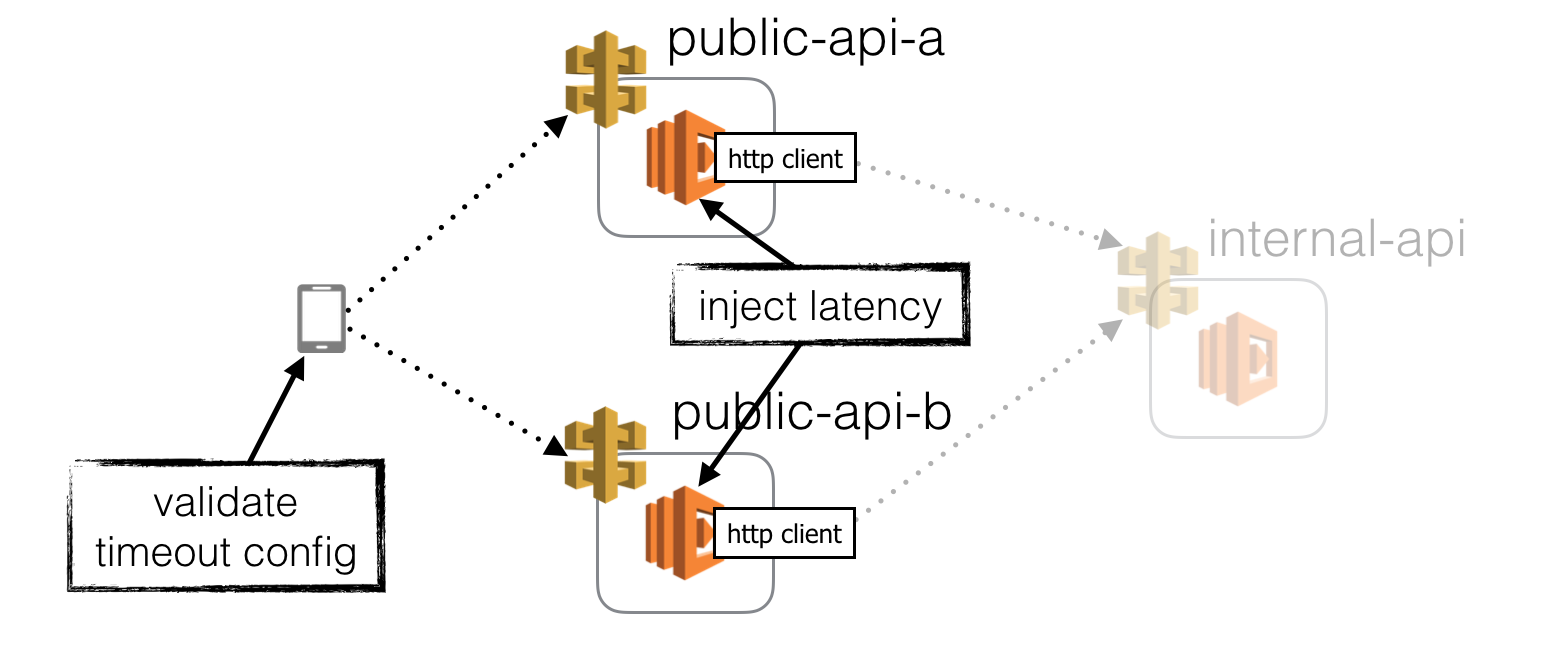
Inject latency to public-facing functions
So far, we have focused on validating the handling of latency spikes and timeouts in our APIs. The same validation is needed for our client application.
We can apply all the same arguments mentioned above here. By injecting latency to our public-facing API functions (in both production as well as dev environments), we can:
- validate the client application handles latency spikes and timeouts gracefully, and offers the best UX as possible in these situations
- train our client developers to expect latency spikes and timeouts
When I was working on a MMORPG at Gamesys years ago, we uncovered a host of frailties in the game when we injected latency spikes and faults to our APIs. The game would crash during startup if any of the first handful of requests fails. In some cases, if the response time was longer than a few seconds then the game would also get into a weird state because of race conditions.
Turns out I was setting my colleagues up for failure in production because the dev environment was so forgiving and gave them a false sense of comfort.
With that, let’s talk about how we can apply the practice of latency injection.
But wait, can’t you inject latency in the client-side HTTP clients too?
Absolutely! And you should! However, for the purpose of this post we are going to look at how and where we can inject latency to our Lambda functions only, hence why I have willfully ignored this part of the equation.
How to inject latency
There are 2 aspects to actually injecting latencies:
- adding delays to operations
- configuring how often and how much delay to add
If you read my previous posts on capturing and forwarding correlation IDsand managing configurations with SSM Parameter Store, then you have already seen the basic building blocks we need to do both.
How to inject latency to HTTP client
Since you are unlikely to write a HTTP client from scratch, so I consider the problem for injecting latency to HTTP client and 3rd party clients (such as the AWS SDK) to be one and the same.
A couple of solutions jump to mind:
- in static languages, you can consider using a static weaver such as AspectJ or PostSharp, this is the approach I took previously
- in static languages, you can consider using dynamic proxies, which many IoC frameworks offer (another form of AOP)
- you can create a wrapper for the client, either manually or with a factory function (bluebirdjs’s
promisifyAllfunction is a good example)
Since I’m going to use Node.js as example, I’m going to focus on wrappers.
For the HTTP client, given the relatively small number of methods you will need, it’s feasible to craft the wrapper by hand, especially if you have a particular API design in mind.
Using the HTTP client I created for the correlation ID post as base, I modified it to accept a configuration object to control the latency injection behaviour.
{
  "isEnabled": true,
  "probability": 0.5,
  "minDelay": 100,
  "maxDelay": 5000
}
You can find this modified HTTP client here, below is a simplified version of this client (which uses superagent under the hood).
'use strict';

const co      = require('co');
const Promise = require('bluebird');

let injectLatency = co.wrap(function* (config) {
  if (config.isEnabled === true && Math.random() < config.probability) {
    let delayRange = config.maxDelay - config.minDelay;
    let delay = Math.floor(config.minDelay + Math.random() * delayRange);

    console.log(`injecting [${delay}ms] latency to HTTP request...`);
    yield Promise.delay(delay);
  }
});

... // other helper functions, like getRequest, etc.

// options: {
//    uri     : string
//    method  : GET (default) | POST | PUT | HEAD
//    headers : object
//    qs      : object
//    body    : object,
//    resolveWithFullResponse : bool (default to false)
//    latencyInjectionConfig : { isEnabled: bool, probability: Double, minDelay: Double, maxDelay: Double }
//  }
let Req = function* (options) {
  let request = getRequest(options);
  let fullResponse = options.resolveWithFullResponse === true;

  let latencyInjectionConfig = options.latencyInjectionConfig;
  yield injectLatency(latencyInjectionConfig);  // <- this is the import bit

  try {
    let resp = yield exec(request);
    return fullResponse ? resp : resp.body;
  } catch (e) {
    if (e.response && e.response.error) {
      throw e.response.error;
    }

    throw e;
  }
};

module.exports = Req;
To configure the function and the latency injection behaviour, we can use the configClient I first created in the SSM Parameter Store post.
First, let’s create the configs in the SSM Parameter Store.
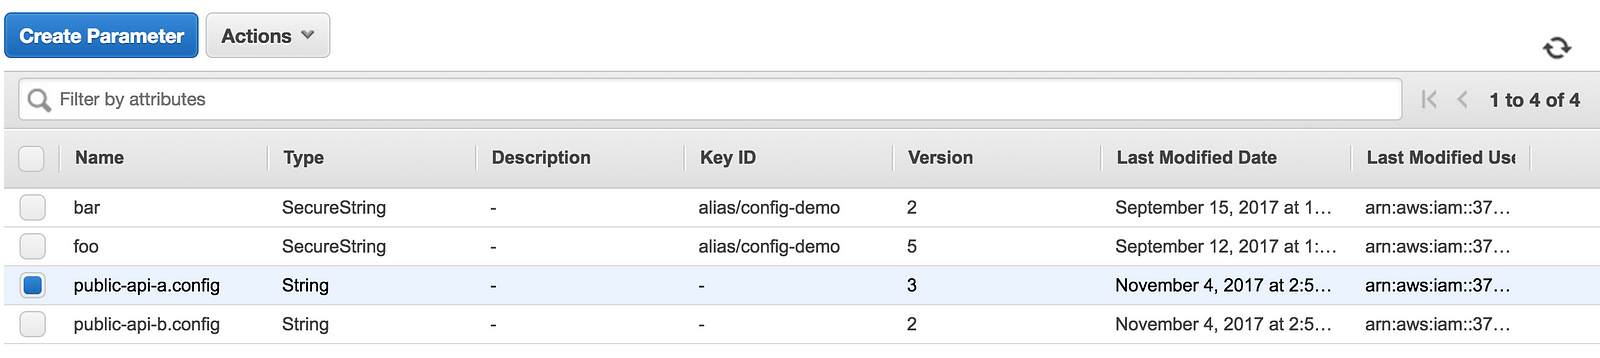
The configs contains the URL for the internal API, as well as a chaosConfigobject. For now, we just have a httpClientLatencyInjectionConfig property, which is used to control the HTTP client’s latency injection behaviour.
{
  "internalApi": "https://xx.amazonaws.com/dev/internal",
  "chaosConfig": {
    "httpClientLatencyInjectionConfig": {
      "isEnabled": true,
      "probability": 0.5,
      "minDelay": 100,
      "maxDelay": 5000
    }
  }
}
Using the aforementioned configClient, we can fetch the JSON config from SSM Parameter Store at runtime.
const configKey = "public-api-a.config";
const configObj = configClient.loadConfigs([ configKey ]);

let config = JSON.parse(yield configObj["public-api-a.config"]);
let internalApiUrl = config.internalApi;
let chaosConfig = config.chaosConfig || {};
let injectionConfig = chaosConfig.httpClientLatencyInjectionConfig;

let reply = yield http({
  method : 'GET',
  uri : internalApiUrl,
  latencyInjectionConfig: injectionConfig
});
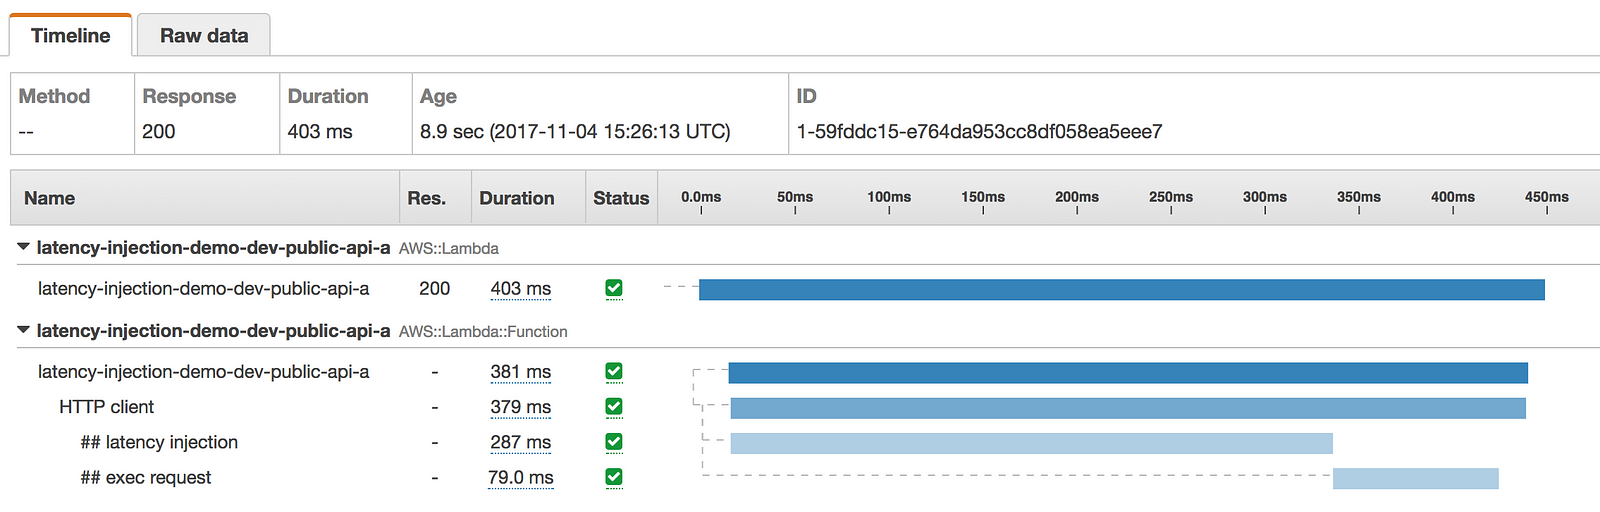
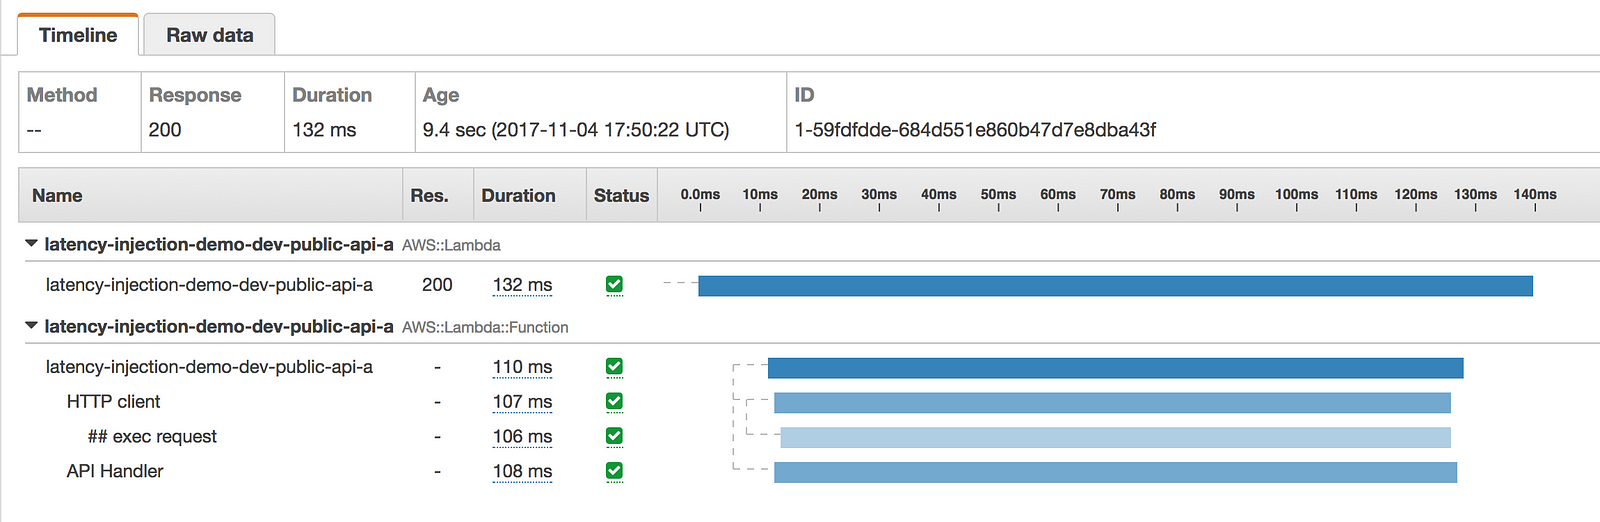
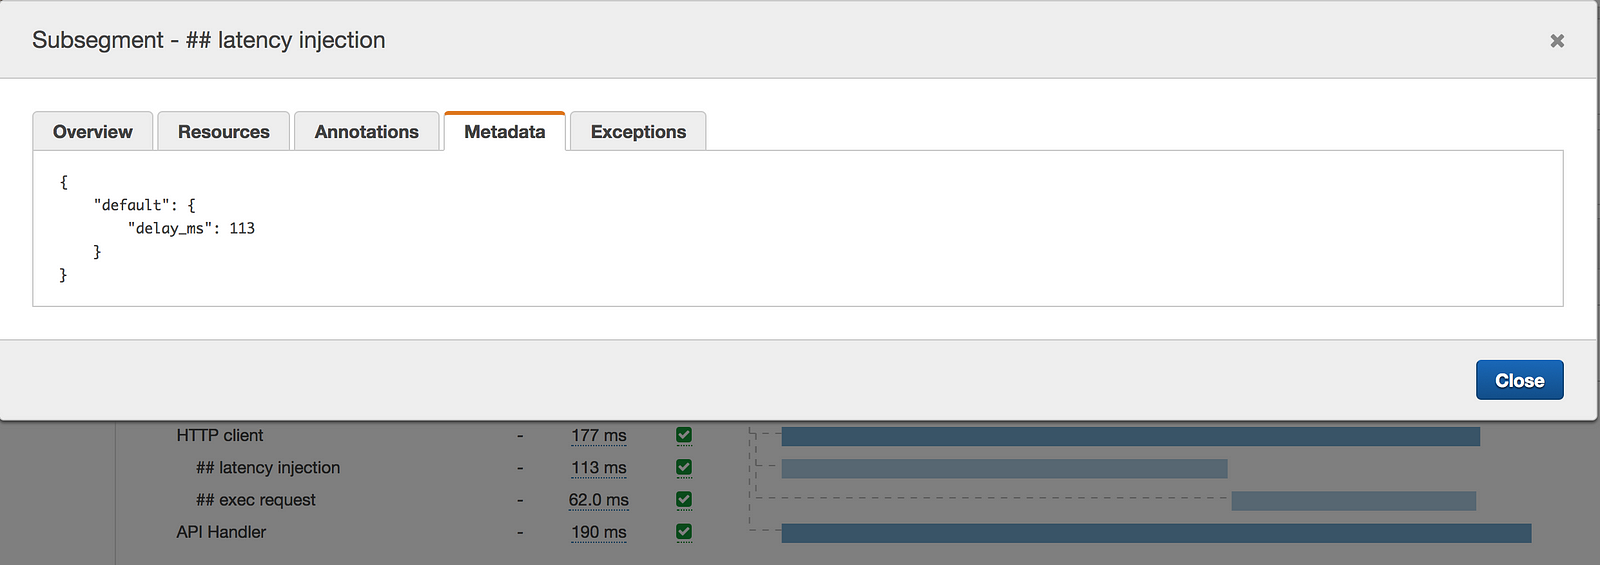
The above configuration gives us a 50% chance of injecting a latency between 100ms and 3sec when we make the HTTP request to internal-api.
This is reflected in the following X-Ray traces.
How to inject latency to AWSSDK
With the AWS SDK, it’s not feasible to craft the wrapper by hand. Instead, we could do with a factory function like bluebird’s promisifyAll.
We can apply the same approach here, and I made a crude attempt at doing just that. I must add that, whilst I consider myself a competent Node.js programmer, I’m sure there’s a better way to implement this factory function.
My factory function will only work with promisified objects (told you it’s crude..), and replaces their xxxAsync functions with a wrapper that takes in one more argument of the shape:
{
  "isEnabled": true,
  "probability": 0.5,
  "minDelay": 100,
  "maxDelay": 3000
}
Again, it’s clumsy, but we can take the DocumentClient from the AWS SDK, promisify it with bluebird, then wrap the promisified object with our own wrapper factory. Then, we can call its async functions with an optional argument to control the latency injection behaviour.
You can see this in action in the handler function for public-api-b .
'use strict';

const co         = require('co');
const apiHandler = require('../lib/apiHandler');
const injectable = require('../lib/injectable');
const Promise    = require('bluebird');
const AWS        = require('aws-sdk');
const asyncDDB   = Promise.promisifyAll(new AWS.DynamoDB.DocumentClient());
const dynamodb   = injectable.injectableAll(asyncDDB);

module.exports.handler = apiHandler(
  "public-api-b.config",
  co.wrap(function* (event, context, config) {
    let chaosConfig = config.chaosConfig || {};
    let latencyInjectionConfig = chaosConfig.latencyInjectionConfig;

    let req = {
      TableName : 'latency-injection-demo-dev',
      Key: { id: 'foo' }
    };

    // the wrapped (and promisified) DocumentClient's async functions can
    // take an optional argument (the last argument) which is expect to be
    // the format of the latencyInjectionConfig, ie. of the shape
    // { isEnabled, probability, minDelay, maxDelay }
    let item = yield dynamodb.getAsync(req, latencyInjectionConfig);

    return {
      message : "everything is still awesome",
      reply   : item
    };
  })
);
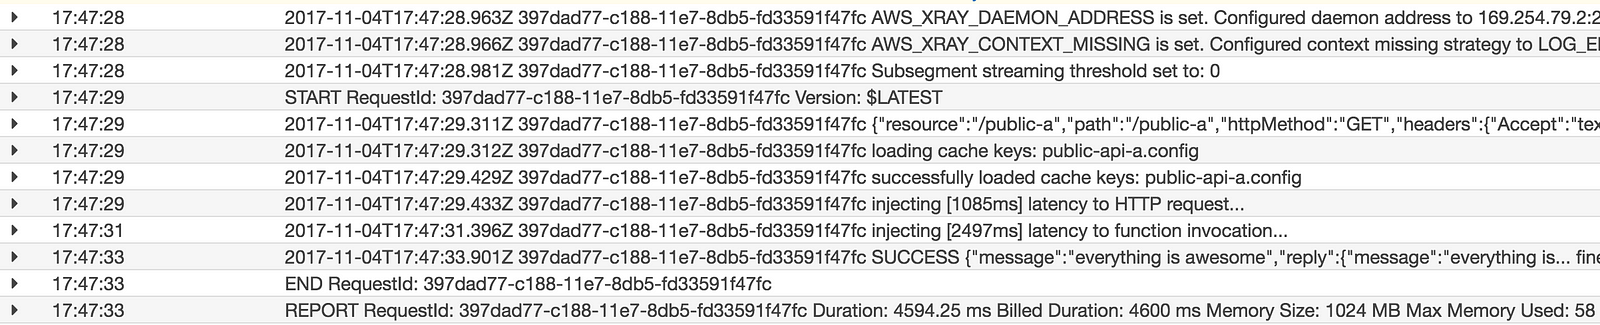
For some reason, the wrapped function is not able to record subsegments in X-Ray. I suspect it’s some nuance about Javascript or the X-Ray SDK that I do not fully understand.
Nonetheless, judging from the logs, I can confirm that the wrapped function does indeed inject latency to the getAsync call to DynamoDB.
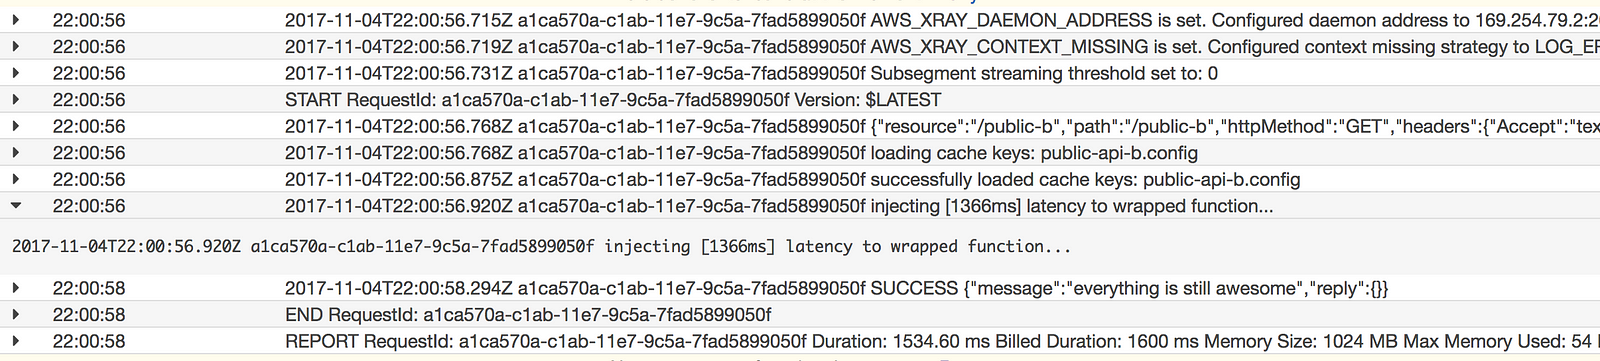
If you know of a way to improve the factory function, or to get the X-Ray tracing work with the wrapped function, please let me know in the comments.
How to inject latency to function invocations
The apiHandler factory function I created in the correlation ID post is a good place to apply common implementation patterns that we want from our API functions, including:
- log the event source as debug
- log the response and/or error from the invocation (which, surprisingly, Lambda doesn’t capture by default)
- initialize global context (eg. for tracking correlation IDs)
- handle serialization for the response object
- etc..
// this is how you use the apiHandler factory function to create a
// handler function for API Gateway event source
module.exports.handler = apiHandler(
  co.wrap(function* (event, context) {
    ... // do bunch of stuff
    // instead of invoking the callback directly, you return the
    // response you want to send, and the wrapped handler function
    // would handle the serialization and invoking callback for you
    // also, it takes care of other things for you, like logging
    // the event source, and logging unhandled exceptions, etc.
   return { message : "everything is awesome" };
  })
);
In this case, it’s also a good place for us to inject latency to the API function.
However, to do that, we need to access the configuration for the function. Time to lift the responsibility for fetching configurations into the apiHandlerfactory then!
The full apiHandler factory function can be found here, below is a simplified version that illustrates the point.
'use strict';

const co = require('co');
const configClient = require('./configClient');

... // helper functions

// configKey : eg. public-api-a.config
// f : handler function with signature (event, context, configValue) => Promise[T]
function createApiHandler (configKey, f) {
  let configObj = configKey ? configClient.loadConfigs([ configKey ]) : undefined;

  // return a wrapped handler function which takes care of common plumbing
  return co.wrap(function* (event, context, cb) {
    console.log(JSON.stringify(event));

    let config =
      configObj
        ? JSON.parse(yield configObj[configKey])
        : undefined;

    try {
      let result = yield Promise.resolve(f(event, context, config));
      result = result || {};

      console.log('SUCCESS', JSON.stringify(result));
      cb(null, OK(result));
    } catch (err) {
      console.error("Failed to process request", err);
      cb(err);
    }
  });
}

module.exports = createApiHandler;
Now, we can write our API function like the following.
'use strict';

const co           = require('co');
const http         = require('../lib/http');
const apiHandler   = require('../lib/apiHandler');

module.exports.handler = apiHandler(
  "public-api-a.config",
  co.wrap(function* (event, context, config) {
    let uri         = config.internalApi;
    let chaosConfig = config.chaosConfig || {};
    let latencyInjectionConfig = chaosConfig.httpClientLatencyInjectionConfig;

    let reply = yield http({ method : 'GET', uri, latencyInjectionConfig });

    return {
      message : "everything is awesome",
      reply   : reply
    };
  })
);
Now that the apiHandler has access to the config for the function, it can access the chaosConfig object too.
Let’s extend the definition for the chaosConfig object to add a functionLatencyInjectionConfig property.
"chaosConfig": {
  "functionLatencyInjectionConfig": {
    "isEnabled": true,
    "probability": 0.5,
    "minDelay": 100,
    "maxDelay": 5000
  },
  "httpClientLatencyInjectionConfig": {
    "isEnabled": true,
    "probability": 0.5,
    "minDelay": 100,
    "maxDelay": 5000
  }
}
With this additional configuration, we can modify the apiHandler factory function to use it to inject latency to a function’s invocation much like what we did in the HTTP client.
let exec = co.wrap(function* (f, event, context, config) {
  try {
    let result = yield Promise.resolve(f(event, context, config));
    return result || {};
  } finally {
    let latencyInjectionConfig = _.get(config, 'chaosConfig.functionLatencyInjectionConfig', {});
    yield injectLatency(latencyInjectionConfig);
  }
});

function createApiHandler (configKey, f) {
  let configObj = configKey ? configClient.loadConfigs([ configKey ]) : undefined;

  return co.wrap(function* (event, context, cb) {
    console.log(JSON.stringify(event));

    let config =
      configObj
        ? JSON.parse(yield configObj[configKey])
        : undefined;

    try {
      let result = yield exec(f, event, context, config);
      console.log('SUCCESS', JSON.stringify(result));
      cb(null, OK(result));
    } catch (err) {
      console.error("Failed to process request", err);
      cb(err);
    }
  });
}
Just like that, we can now inject latency to function invocations via configuration. This will work for any API function that is created using the apiHandler factory.
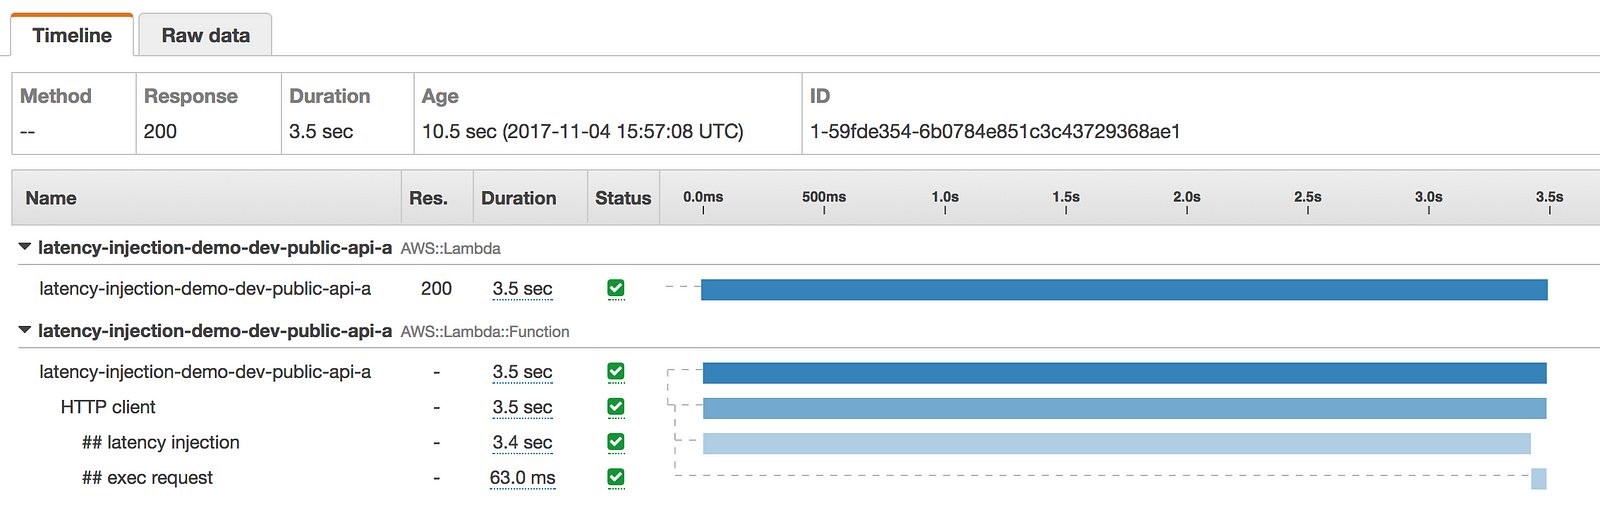
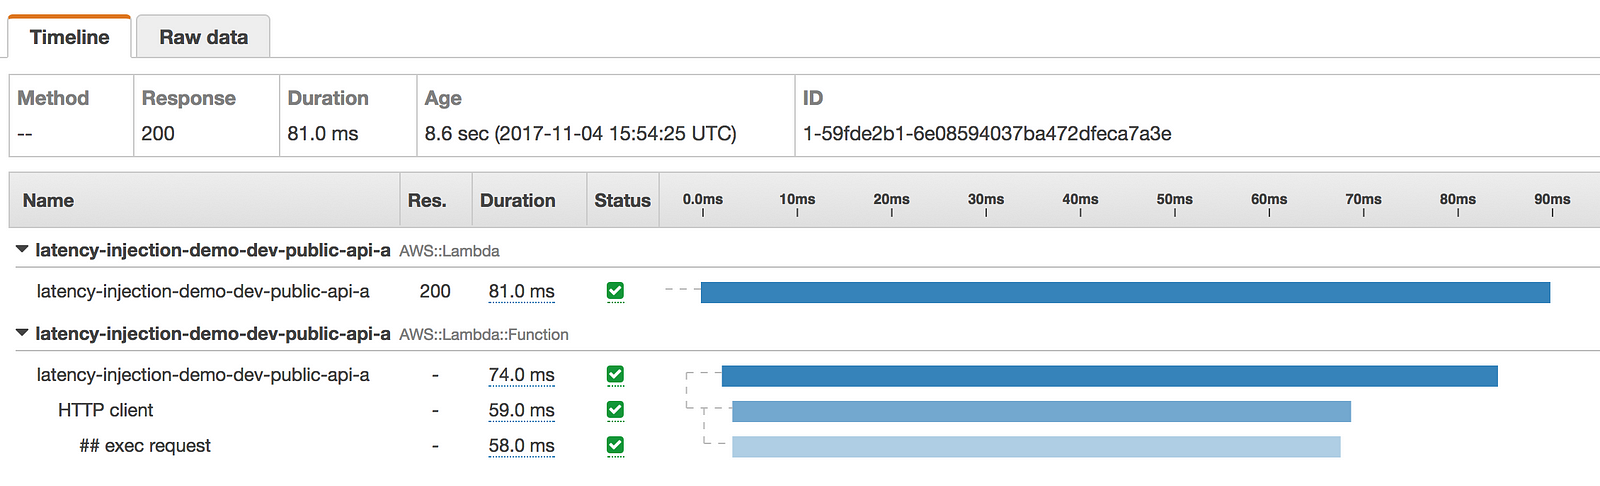
With this change and both kinds of latency injections enabled, I can observe all the expected scenarios through X-Ray:
- no latency was injected
- latency was injected to the function invocation only
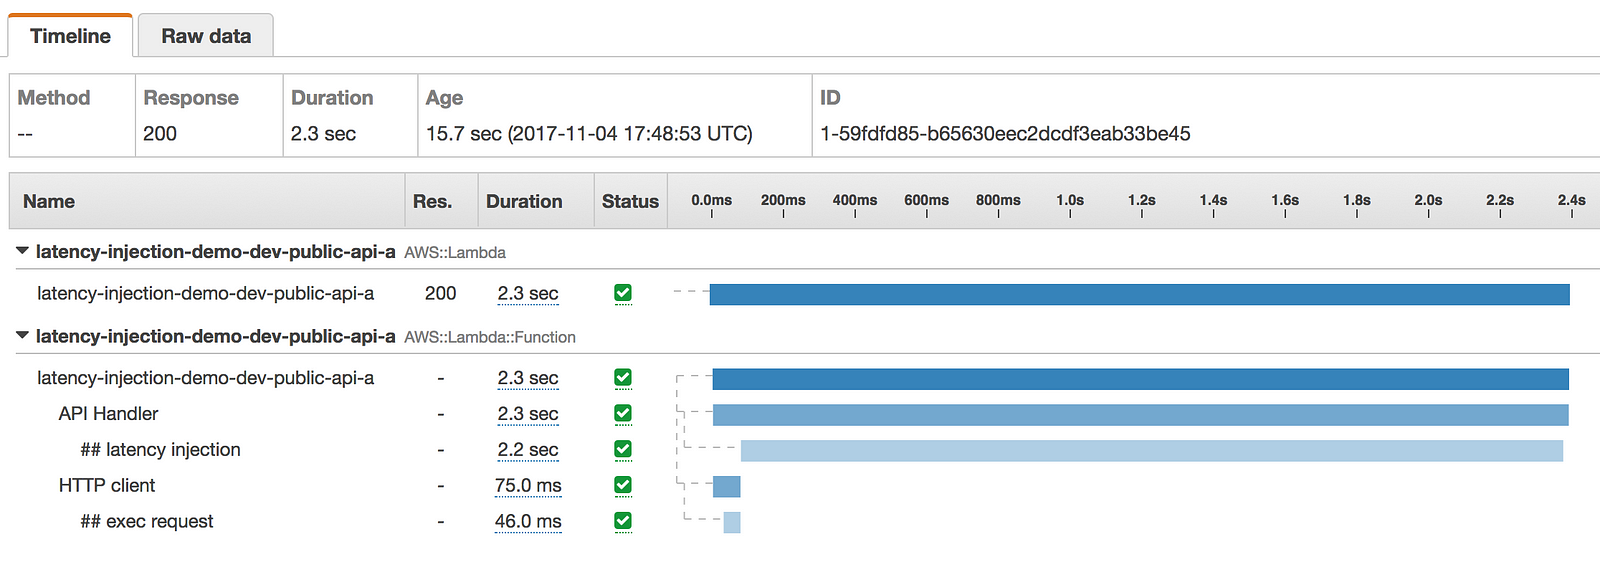
- latency was injected to the HTTP client only
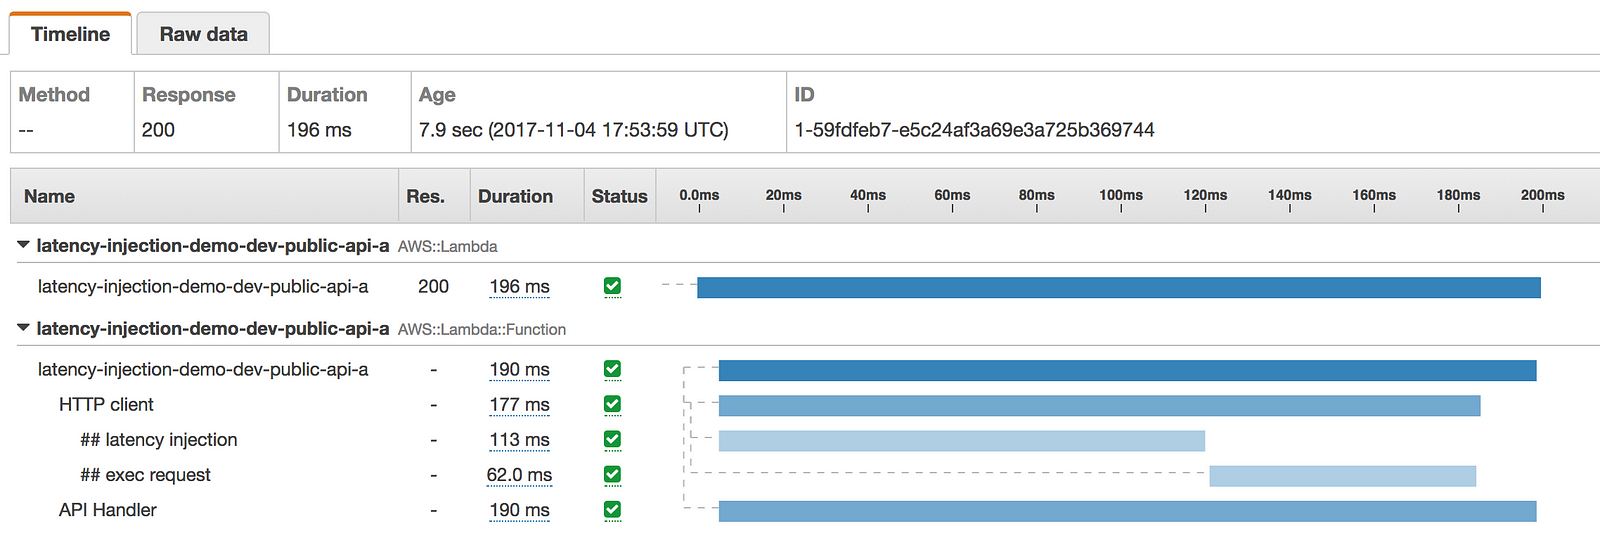
- latency was injected to both HTTP client and the function invocation, but the invocation did not timeout as a result

- latency was injected to both HTTP client and the function invocation, and the invocation times out as a result

I can get further confirmation of the expected behaviour through logs, and the metadata recorded in the X-Ray traces.
Recap, and future works
In this post we discussed:
- why you should consider applying the practice of latency injection to APIs created with API Gateway and Lambda
- additional considerations specific to API Gateway and Lambda
- where you can inject latencies, and why you should consider injecting latency at each of these places
- how you can inject latency in HTTP clients, AWS SDK, as well as the function invocation
The approach we have discussed here is driven by configuration, and the configuration is refreshed every 3 mins by default.
We can go much further with this.
Fine grained configuration
The configurations can be more fine grained, and allow you to control latency injection to specific resources.
For example, instead of a blanket httpClientLatencyInjectionConfig for all HTTP requests (including those requests to AWS services), the configuration can be specific to an API, or a DynamoDB table.
Automation
The configurations can be changed by an automated process to:
- run routine validations daily
- stop all latency injections during off hours, and holidays
- forcefully stop all latency injections, eg. during an actual outage
- orchestrate complex scenarios that are difficult to manage by hand, eg. enable latency injection at several places at once
Again, we can look to Netflix for inspiration for such an automated platform.
Usually, you would want to enable one latency injection in a bounded context at a time. This helps contain the blast radius of unintended damages, and make sure your experiments are actually controlled. Also, when latency is injected at several places, it is harder to understand the causality we observe as there are multiple variables to consider.
Unless, of course, you’re validating against specific hypothesis such as:
The system can tolerate outage to both the primary store (DynamoDB) as well as the backup store (S3) for user preferences, and would return a hardcoded default value in that case.
Better communication
Another good thing to do, is to inform the caller of the fact that latency has been added to the invocation by design.
This might take the form of a HTTP header in the response to tell the caller how much latency was injected in total. If you’re using an automated process to generate these experiments, then you should also include the id/tag/name for the specific instance of the experiment as HTTP header as well.
What’s next?
As I mentioned in the previous post, you need to apply common sense when deciding when and where you apply chaos engineering practices.
Don’t attempt an exercises that you know is beyond your abilities.
Before you even consider applying latency injection to your APIs in production, you need to think about how you can deal with these latency spikes given the inherent constraints of API Gateway and Lambda.
Unfortunately, we have run out of time to talk about this in this post, but come back in 2 weeks and we will talk about several strategies you can employ in part 3.
The code for the demo in this post is available on github here. Feel free to play around with it and let me know if you have any suggestions for improvement!
References
- Hack the brains of other people with API design
- Design for latency issues
- Capture and forward correlation IDs through different Lambda event sources
- You should use SSM Parameter Store over Lambda env variables
- ChAP: Chaos Automation Platform
Whenever you’re ready, here are 4 ways I can help you:
- If you want a one-stop shop to help you quickly level up your serverless skills, you should check out my Production-Ready Serverless workshop. Over 20 AWS Heroes & Community Builders have passed through this workshop, plus 1000+ students from the likes of AWS, LEGO, Booking, HBO and Siemens.
- If you want to learn how to test serverless applications without all the pain and hassle, you should check out my latest course, Testing Serverless Architectures.
- If you’re a manager or founder and want to help your team move faster and build better software, then check out my consulting services.
- If you just want to hang out, talk serverless, or ask for help, then you should join my FREE Community.