Yan Cui
I help clients go faster for less using serverless technologies.
This article is brought to you by

The real-time data platform that empowers developers to build innovative products faster and more reliably than ever before.
Forewords
A while back I decided to try and learn Python for the hell of it as it seems like an interesting language and has some of the most concise and user-friendly syntax. Having spent some time going through a number of different learning sources and materials (like the official site python.org which has a very helpful tutorial section) I have put together a set of notes I made as I was learning and hopefully they can be useful to you as a quick list of how-to code snippets.
All the code snapshots I’m showing here are taken from the IDLE Python shell.
Input and Output
The repr() function generates representations that can be read by the interpreter, str() function generates a human-readable of the value:

If an object doesn’t have a particular representation for human consumption, str() will return the same value as repr(), e.g. lists and dictionaries:

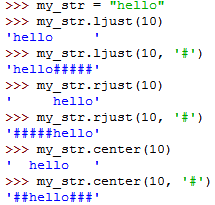
You can use the string.rjust(), string.ljust() or string.center() function to left-justify, right-justify or center a string of given width by padding it with spaces:

You can use the string.zfill() function to pad a numeric string on the left with zeros:

You can use string.format() method to format the string output of your code:

You can also use named arguments:
![]()
An optional ‘:‘ and format specifier can follow the field name to allow greater control over how the value is formatted:

Passing an integer after the ‘:‘ will cause that field to be a minimum number of characters wide:

For a very long string, you could even reference variables to be formatted by name using a dictionary:

Or you could unpack the dictionary first:
![]()
You can use the open() function to get a file object, to open a file for writing:
![]()
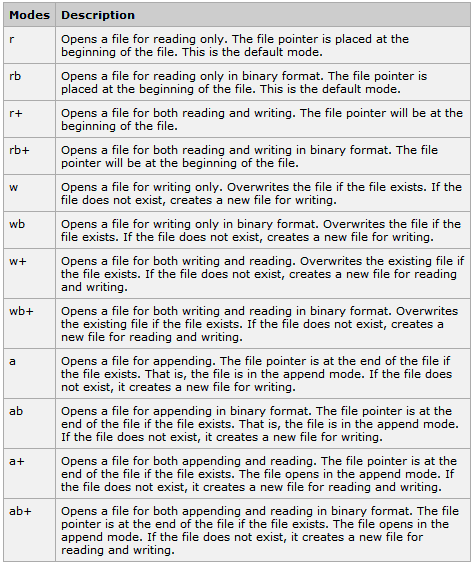
The first parameter being the file name, the second the mode which can be one of the following:

To open a file and read its contents:
![]()
To read one line at a time

To read the lines in the file as an array of strings:
![]()
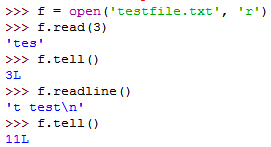
You can also read x number of bytes at a time:
![]()
But remember, you always read starting from the position where your last read finished:

To write to a file:
![]()
You can only write string contents to a file, which means you’d need to convert other objects to string first:

To flush the file buffer and actually write them to the file, use the close() function, after which you’ll need to open the file again:

You can use the tell() function to find out your current position in the file:

You can use the seek() function to change the file object’s current position, seek(offset, from_what):

from_what can be one of three values:
- 0 – beginning of file (default)
- 1 – current position
- 2 – end of the file

It’s good practice to use the with keyword when dealing with file objects, which ensures that the file is closed after its suite finishes. (this works like the using keyword in C#).

To deal with complex types (or indeed any non-string types like int) you can use the pickle module to convert it to and from string.
The process of converting a complex type to string is called pickling.
The process of constructing a complex type from string is called unpickling.

Exceptions
try-except block:
![clip_image001[10] clip_image001[10]](/wp-content/uploads/2011/03/clip_image001102.png)
You can handle more than one exception if you name them in a tuple:
![clip_image002[4] clip_image002[4]](/wp-content/uploads/2011/03/clip_image00241.png)
You can handle a list of exceptions in a certain priority list and if you don’t specify a particular exception type it’ll serve as a wildcard:
![clip_image003[8] clip_image003[8]](/wp-content/uploads/2011/03/clip_image00381.png)
You can also specify a else clause which follows all except clauses, it’s useful for code that must be executed if the try clause does not raise an exception:
![clip_image004[4] clip_image004[4]](/wp-content/uploads/2011/03/clip_image00441.png)
The use of the else clause is better than adding additional code to the try clause because it avoids accidentally catching an exception that wasn’t raised by the code being protected by the try-except statement.
There’s also the optional finally clause which is intended to define clean-up actions that must be executed under all circumstances:
![clip_image005[4] clip_image005[4]](/wp-content/uploads/2011/03/clip_image00541.png)
You can get more information about the instance of the exceptions:
![clip_image006[4] clip_image006[4]](/wp-content/uploads/2011/03/clip_image0064.png)
![clip_image007[4] clip_image007[4]](/wp-content/uploads/2011/03/clip_image00741.png)
To throw an exception:
![clip_image008[9] clip_image008[9]](/wp-content/uploads/2011/03/clip_image0089.png)
To re-throw an exception:
![clip_image009[4] clip_image009[4]](/wp-content/uploads/2011/03/clip_image0094.png)
To define a custom exception:
![clip_image010[4] clip_image010[4]](/wp-content/uploads/2011/03/clip_image01041.png)
The __str__() function ensures that you can print the exception instance directly:
![clip_image011[4] clip_image011[4]](/wp-content/uploads/2011/03/clip_image01141.png)
When creating a module that can raise several distinct errors, a common practice is to create a base class for exceptions defined by that module, and subclass that to create specific exception classes for different error conditions:
![clip_image012[4] clip_image012[4]](/wp-content/uploads/2011/03/clip_image01241.png)
Some objects define standard clean-up actions, for instance, the with statement always closes the file after the statement is executed:
![clip_image013[4] clip_image013[4]](/wp-content/uploads/2011/03/clip_image01341.png)
(the same as the using statement in C#)
Whenever you’re ready, here are 4 ways I can help you:
- Production-Ready Serverless: Join 20+ AWS Heroes & Community Builders and 1000+ other students in levelling up your serverless game. This is your one-stop shop for quickly levelling up your serverless skills.
- Do you want to know how to test serverless architectures with a fast dev & test loop? Check out my latest course, Testing Serverless Architectures and learn the smart way to test serverless.
- I help clients launch product ideas, improve their development processes and upskill their teams. If you’d like to work together, then let’s get in touch.
- Join my community on Discord, ask questions, and join the discussion on all things AWS and Serverless.