
Yan Cui
I help clients go faster for less using serverless technologies.
Disclaimer: I do not claim credit for the code examples and much of the contents here, these are mostly extracts from the book by Chris Smith, Programming F#: A comprehensive guide for writing simple code to solve complex problems. In fact, if you’re thinking of learning F# and like what you read here, you should buy the book yourself, it’s easy to read and the author has gone go great lengths to keep things simple and included a lot of code examples for you to try out yourself.
Tuple
A tuple (pronounced “two-pull”) is an ordered collection of data, and an easy way to group common pieces of data together.
A tuple type is described by a list of the tuple’s elements’ types, separated by asterisks:
![]()
You can even have tuples that contain other tuples:

There’s a number of ways to extract values from a tuple, there’s fst (first) and snd (second) functions if you have a two-elements tuple:
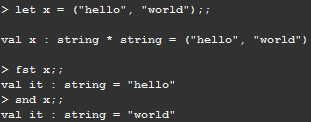
And then there’s the let binding:

But remember, you’ll get a compile error if you try to extract too many or too few values from a tuple.
It is possible to pass tuples as parameters to functions:
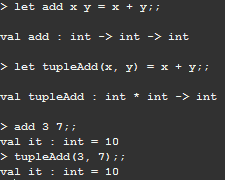
Lists
Whereas tuples group values into a single entity, lists allow you to link data together to form a chain. Doing so allows you to process list elements in bulk using aggregate operators.
You can declare a list like this:

Notice in the snippet above the empty list had type ‘a list because it could be of any type, therefore it’s generic.
Unlike other languages, F# lists are quite restrictive in how you access and manipulate them – there are only two operations you can perform with a list:
- The first is cons, represented by the :: or cons operator. This joins an element to the front or head of a list:

- The second is append, uses the @ operator. Append joins two lists together:
![]()
List ranges
Declaring list elements as a semicolon-delimited list quickly becomes tedious, especially for large lists. To declare a list of ordered numeric values, use the list range syntax:

If an optional step value is provided, then the result is a list of values in the range between two numbers separated by the stepping value:
![]()
List comprehensions
List comprehensions is a rich syntax that allows you to generate lists inline with F# code. The body of the list comprehension will be executed until it terminates, and the list will be made up of elements returned via the yield keyword:
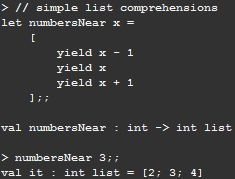
Almost any F# code can exist inside of list comprehensions, including things like function declarations and for loops:
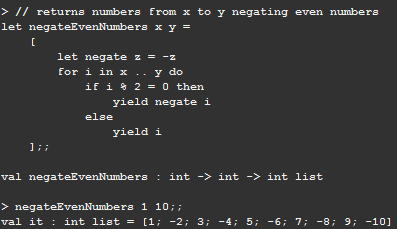
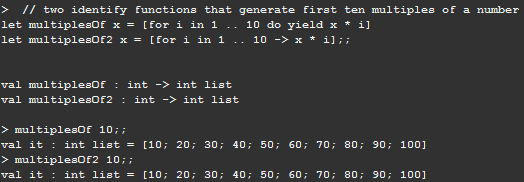
When using loops within list comprehensions, you can simply the code by using -> instead of do yield:
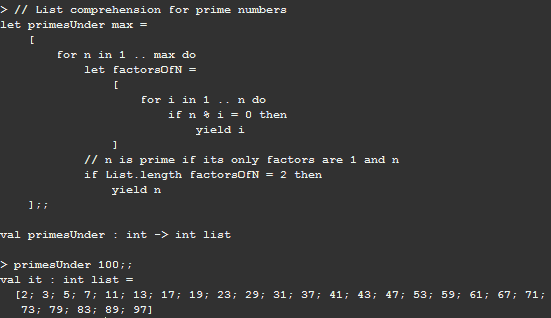
Here’s a more complex example showing how you can use list comprehension to easily find prime numbers:
List module functions
The F# library’s List module contains many methods to help you process lists:

The following example demonstrates the List.partition function, partitioning a list of numbers from 1 to 15 into two new lists: one comprised of multiples of five and the other list made up of everything else:

The trick is that List.partition returns a tuple.
Aggregate Operators
Although lists offer a way to chain together pieces of data, there really isn’t anything special about them. The true power of lists lies in aggregate operators, which are a set of power functions that are useful for any collection of values..
List.map
List.map is a projection operation that creates a new list based on a provided function. Each element in the new list is the result of evaluating the function, it has type (‘a -> ‘b) -> ‘a list -> ‘b list
The following example shows the result of mapping a square function to a list of integers:

List.map is one of the most useful functions in the F# language, it provides an elegant way for you to transform data.
List.fold
Folds represent the most powerful type of aggregate operator and not surprisingly the most complicated. When you have a list of values and you want to distil it down to a single piece of data, you use a fold.
There are two main types of folds you can use on lists, first is List.reduce which has type (‘a -> ‘a -> ‘a) -> ‘a list -> ‘a
List.reduce iterates through each element of a list, building up an accumulator value, which is the summary of the processing done on the list so far. Once every list item has been processed, the final accumulator value is returned, the accumulator’s initial value in List.reduce is the first element of the list.
This example demonstrates how to use List.reduce to comma-separate a list of strings:
![clip_image001[7] clip_image001[7]](/wp-content/uploads/2010/01/clip_image0017.png)
Whilst useful, reduce fold forces the type of the accumulator to have the same type as the list. If you want to use a custom accumulator type (e.g. reducing a list of items in a shopping cart to a cash value), you can use List.fold.
The fold function takes three parameters:
- A function that when provided an accumulator and list element returns a new accumulator.
- An initial accumulator value.
- The list to fold over.
The return value of the function is the final state of the accumulator. The type of the fold function is:
(‘acc -> ‘b -> ‘acc) -> ‘acc -> ‘b list -> ‘acc
Here’s an example of how you can use it to count the number of vowels in a string:
![clip_image002[7] clip_image002[7]](/wp-content/uploads/2010/01/clip_image00271.png)
Folding right-to-left
List.reduce and List.fold process the list in a left-to-right order. There are alternative functions List.reduceBack and List.foldBack for processing lists in right-to-left order.
Depends on what you are trying to do, processing a list in reverse order can have a substantial impact on performance.
List.iter
The final aggregate operator, List.iter, iterates through each element of the list and calls a function that you pass as a parameter, it has type (‘a -> unit) -> ‘a list -> unit
Because List.iter returns unit, it is predominately used for evaluating the side effect of the given method, meaning that executing the function has some side effect other than its return value (e.g. printfn has the side effect of printing to the console in addition to returning unit):
![clip_image001[9] clip_image001[9]](/wp-content/uploads/2010/01/clip_image0019.png)
Option
If you want to represent a value that may or may not exist, the best way to do so is to use the option type. The option type has only two possible values: Some(‘a’) and None.
A typical situation you’ll use an option type is when you want to parse a string as an int and if the string is properly formatted you’ll get an int, but if the string is not properly formatted you’ll get None:
![clip_image002[9] clip_image002[9]](/wp-content/uploads/2010/01/clip_image00291.png)
A common idiom in C# is to use null to mean the absence of a value. However, null is also used to indicate an uninitialized value, this duality can lead to confusion and bugs. If you use the option type, there is no question what the value represents, similar to how System.Nullable works in C#.
To retrieve the value of an option, you can use Option.get.
![clip_image003[7] clip_image003[7]](/wp-content/uploads/2010/01/clip_image0037.png)
One thing to watch out though, is that if you call Option.get on None, an exception will be thrown. To get around this, you can use Option.isSome or Option.isNone to check before the value of the option type before attempting to access it, similar to System.Nullable.HasValue in C#.
Printfn
printfn comes in three main flavours: printf, printfn, and sprintf.
printf takes the input and writes it to the screen, whereas printfn writes it to the screen and adds a line continuation.
pinrtf has formatting and checking built-in (e.g. printfn “%s is %d%c high” mountain height units), it’s also strong typed and uses F#’s type inference system so the compiler will give you an error if the data doesn’t match the given format specifier.
Here’s a table of printf format specifiers:

sprintf is used when you want the result of the printing as a string:
![clip_image001[11] clip_image001[11]](/wp-content/uploads/2010/01/clip_image00111.png)
Anatomy of an F# Program
Most other languages, like C#, require an explicit program entry point, often called a main method. In F#, for single-file applications, the contents of the code file are execute from top to bottom in order without the need for declaring a specific main method.
For multi-file projects, however, code needs to be divided into organization units called modules or namespaces.
Modules
By default, F# puts all your code into an anonymous module with the same name as the code file with the first letter capitalized. So if you have a value named value1, and your code is in file1.fs, you can refer to it by using the fully qualified path: File1.value1.
You can explicitly name your code’s module by using the module keyword at the top of a code file:
![clip_image001[13] clip_image001[13]](/wp-content/uploads/2010/01/clip_image00113.png)
Files can contain nested modules as well. To declare a nested module, use the module keyword followed by the name of your module and an equals sign =. Nested modules must be indented to be disambiguated from the “top-level” module:
![clip_image002[11] clip_image002[11]](/wp-content/uploads/2010/01/clip_image00211.png)
Namespaces
The alternative to modules is namespaces. Namespaces are a unit of organizing code just like modules with the only difference being that namespaces cannot obtain value, only type declarations.
Also, namespaces cannot be nested in the same way that modules can, instead, you can add multiple namespaces to the same file:
![clip_image001[15] clip_image001[15]](/wp-content/uploads/2010/01/clip_image00115.png)
It may seem strange to have both namespaces and modules in F#. Modules are optimized for rapid prototyping and quickly exploring a solution, as you have seen so far. Namespaces, on the other hand, are geared toward larger-scale projects with an object-oriented solution.
Program Startup
For single file projects, the code will be executed from top to bottom, however, when a you add a new file to the project, the newly added file will be run when the program starts up.
For more formal program-startup semantics, you can use the [<EntryPoint>] attribute to define a main method. To qualify, your method must:
- Be the last function defined in the last compiled file in your project.
- Take a single parameter of type string array, which are the arguments to your program.
- Return an integer, which is your program’s exit code.
Whenever you’re ready, here are 3 ways I can help you:
- Production-Ready Serverless: Join 20+ AWS Heroes & Community Builders and 1000+ other students in levelling up your serverless game. This is your one-stop shop for quickly levelling up your serverless skills.
- I help clients launch product ideas, improve their development processes and upskill their teams. If you’d like to work together, then let’s get in touch.
- Join my community on Discord, ask questions, and join the discussion on all things AWS and Serverless.

This is the first blog I read on my new Droid Tablet. I’ll be back.. I’m currently working on Fishbone Diagram project.